Selenium Automation with Python Part 3: Elements, Locators, Interactions, and Assertions Explained in Depth

Introduction: Why Selenium Still Matters
Automation testing is no longer a “good to have” skill — it has officially become a must-have in modern software development and QA. Applications today are growing faster than our coffee breaks ☕, features are added every sprint, and release cycles are getting shorter and shorter.
Let’s be honest — manual testing alone just can’t keep up anymore.
Imagine clicking the same button, filling the same form, and checking the same validation again and again for every release. Sounds exhausting, right?
That’s exactly where Selenium automation steps in and saves both time and sanity.
Quick Recap (So We’re All on the Same Page)
In my previous blogs, we already covered:
-
What is Automation Testing and why it actually matters in the real world
-
Getting started with Python for Selenium automation (yes, Python — simple and powerful)
-
Core Selenium components like:
-
WebDriver
-
Selenium IDE
-
Selenium Grid
-
And a basic introduction to locators
-
So if you’ve been following along — great.
If not, don’t worry. This blog is still beginner-friendly.
Going One Level Deeper 🚀
In this blog, we’re not just talking about Selenium — we’re talking about how Selenium actually works when you write test scripts.
This is where things start to feel real.
👉 This article focuses on the core building blocks of Selenium automation — the things you’ll use in every single test case, no matter how big or small the project is:
-
Web Elements – the things you see and click on (buttons, inputs, links, checkboxes… yes, all the annoying ones)
-
Locators – how Selenium finds those elements without getting lost
-
Interactions – typing, clicking, selecting, and basically behaving like a very obedient user
-
Assertions & Verification – checking whether things actually worked or Selenium just thought they worked
Why This Matters
If you’re writing Selenium scripts in the real world:
-
You identify elements
-
You locate them
-
You interact with them
-
And finally, you verify the result
That’s it.
No magic. No shortcuts.
These are the exact things you deal with every single day when writing real-world Selenium test scripts — whether you’re testing a login page, a checkout flow, or a production bug that “works on my machine”.
In the next sections, we’ll break all of this down step by step, in a simple, practical, and slightly fun way — without turning it into a boring textbook.
What Should You Focus on When Writing Selenium Automation?
Before jumping straight into code and writing driver.find_element(...) everywhere, it’s important to pause for a moment and understand how Selenium actually “sees” a web application.
Because Selenium doesn’t see colors, layouts, animations, or beautiful UI designs like we do.
Selenium is very simple-minded 😄
From Selenium’s perspective, a web application is nothing but a collection of:
-
Elements – things present on the page
-
Properties (Attributes) – IDs, names, classes, placeholders, values, etc.
-
Behavior – what those elements do when you click, type, submit, or hover
That’s it. No emotions. No confusion. Just elements and actions.

The Automation Mindset (Think Like Selenium 🤖)
So whenever you write an automation script, the process always looks like this:
1️⃣ Identify an element
👉 “Okay, what am I dealing with? A button? A text field? A checkbox?”
2️⃣ Locate the element
👉 “How can Selenium find this element without getting lost on the page?”
3️⃣ Interact with the element
👉 “Should I click it, type into it, select it, or just check if it exists?”
4️⃣ Verify the result
👉 “Did it actually work, or did Selenium just blindly click and move on?”
If any one of these steps is missing, your automation is incomplete.
Why These Steps Matter
A lot of beginners make this mistake:
-
They write scripts that click things
-
But never verify outcomes
That’s not automation — that’s just Selenium playing around on a website.
This entire blog revolves around these four fundamental steps, because once you truly understand them, you can automate almost any web application, no matter how complex it looks on the surface.
In the upcoming sections, we’ll break each of these steps down with real examples, simple explanations, and a few relatable tester moments — so you don’t just memorize Selenium, you actually understand it.
1. Understanding Web Elements in Selenium
Before Selenium can automate anything, it first needs to understand what exists on the web page.
That’s where web elements come into the picture.
A web element is any object present on a web page that a user can interact with or observe.
If a user can see it, click it, type into it, or accidentally click it — Selenium can probably handle it too 😄
Common Examples of Web Elements
Most web applications are built using the same set of elements again and again:
-
Text fields – username, email, search boxes
-
Buttons – Login, Submit, Save, Delete
-
Checkboxes – Remember me, Accept terms
-
Radio buttons – selecting one option from a group
-
Dropdowns – choosing country, category, role
-
Links – navigation, forgot password, sign up
-
Images – logos, icons, banners
-
Labels – text describing input fields
-
Alerts – pop-ups that demand attention
-
Forms – containers that hold everything together
In Selenium, everything starts with elements.
If Selenium can’t find an element, it simply can’t move forward.
Common Types of Web Elements
Let’s break down the most important web elements you’ll encounter in real-world automation projects.
1. Text Fields (Input Boxes)
Text fields are used to enter data into an application.
They are usually the first elements you automate — especially on login and signup pages.
Common use cases:
-
Username
-
Password
-
Email
-
Search text
Example HTML:
Selenium (Python):
What Can You Do with Text Fields?
With text fields, Selenium allows you to:
-
Type text using
send_keys() -
Clear existing text using
clear() -
Read entered values using attributes
Example:
💡 Tester moment:
If your login fails because old text was still present, Selenium didn’t fail — you forgot to clear the field 😄
2. Password Fields
Password fields behave just like text fields, but the input values are masked for security.
HTML example:
Selenium:
From Selenium’s point of view, it’s just another input field — no secrets here 🤫
3. Buttons
Buttons are responsible for triggering actions.
They are used for actions like:
-
Login
-
Submit
-
Save
-
Delete
HTML example:
Selenium:
Buttons are simple, but they often decide whether your test passes or fails.
4. Checkboxes
Checkboxes allow multiple selections.
HTML example:
Selenium:
You can also verify whether a checkbox is selected:
💡 Pro tip: Always check before clicking to avoid toggling it accidentally.
5. Radio Buttons
Radio buttons allow only one selection from a group.
HTML example:
Selenium:
Once selected, another option in the same group automatically gets unselected.
6. Dropdowns (Select Elements)
Dropdowns are extremely common in forms.
HTML example:
Selenium provides a special Select class to handle dropdowns:
You can also select by value or index depending on your requirement.
7. Links
Links are used for navigation.
HTML example:
Selenium:
Links can be located using full text or partial text.
8. Images
Images can be:
-
Informational (logos)
-
Clickable (icons, banners)
HTML example:
Verify image presence:
💡 If an image is missing, it’s often a UI bug, not an automation issue.
2. Locators in Selenium (The Most Important Concept)
If web elements are the body, then locators are the brain of Selenium automation.
A locator tells Selenium how to find an element on a web page.
Without locators, Selenium has no idea:
-
what to click
-
where to type
-
or what to verify
It will just sit there… staring at the page 🤖
Why Locators Matter So Much
If your locators are weak:
-
❌ Tests become flaky
-
❌ Scripts fail randomly
-
❌ Maintenance becomes painful
-
❌ And you start hearing: “Automation is unstable”
In reality, most automation issues are locator issues, not Selenium issues.
Strong locators = stable tests.
Types of Locators in Selenium
Selenium supports multiple locator strategies, and each one has its own use case.
Let’s go through them one by one — from the best to the most flexible.
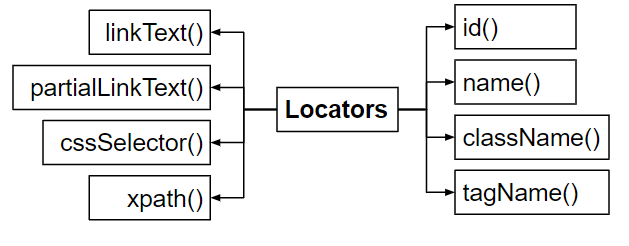
1. ID Locator (Best & Fastest ✅)
If an element has a unique and stable ID, you’ve already won.
HTML example:
Selenium:
✅ Best practice: Always prefer ID if it is unique and doesn’t change.
💡 Think of ID like a person’s Aadhaar number — unique and reliable.
2. Name Locator
If ID is not available, name can be a good alternative.
HTML example:
Selenium:
Works well for form fields, but uniqueness is not always guaranteed.
3. Class Name Locator
Used when elements are identified by CSS classes.
HTML example:
Selenium:
⚠️ Important limitation:
You cannot use multiple class names together with By.CLASS_NAME.
❌ This will not work:
4. Tag Name Locator
Used when you want to locate elements by their HTML tag.
Example:
This returns a list of elements, not just one.
Common use cases:
-
Counting links
-
Looping through buttons
-
Checking presence of multiple elements
5. Link Text Locator
Used to locate links by their exact visible text.
Example:
Best when link text is stable and clear.
6. Partial Link Text Locator
Used when only part of the link text is known.
Example:
Useful when:
-
Link text changes dynamically
-
Text contains extra spaces or symbols
⚠️ Use carefully — it can match multiple links if not specific enough.
7. CSS Selector (Very Powerful 🚀)
CSS selectors are:
-
Fast
-
Flexible
-
Widely used in modern automation
Examples:
Many automation engineers prefer CSS selectors because they are:
-
Cleaner than XPath
-
Faster in execution
-
Easier to maintain
8. XPath (Most Flexible, But Use Wisely)
XPath is extremely powerful, especially for complex or dynamic DOM structures.
Examples:
Types of XPath
-
❌ Absolute XPath – very fragile, avoid using
-
✅ Relative XPath – stable and recommended
💡 XPath is like a Swiss Army knife — very useful, but dangerous if overused.
Final Tip on Locators
Always ask yourself:
“Will this locator still work after 3 months?”
If the answer is yes, you’re doing it right.
3. Interacting with Web Elements
Finding an element is only half the job.
Once Selenium locates an element, the next step is interaction — this is where Selenium starts behaving like a real user (a very obedient one).
Typing, clicking, selecting, reading text — these are the actions that actually test the application.
Typing Text into Input Fields
To type text into a text field or password field, Selenium uses send_keys().
This simulates a real user typing from the keyboard.
💡 Tester reality:
If Selenium types faster than you can blink — that’s normal. It doesn’t make typos (sadly).
Clearing Existing Text
Before typing new data, it’s often a good idea to clear existing text.
This avoids issues like:
-
Text getting appended
-
Old values interfering with new test data
💡 If your test fails because text wasn’t cleared, Selenium isn’t broken — logic is 😄
Clicking Elements
Clicking is the most common interaction in Selenium.
You use this for:
-
Buttons
-
Checkboxes
-
Radio buttons
-
Links
-
Images
If Selenium can’t click an element, it usually means:
-
The element isn’t visible
-
The element isn’t enabled
-
Or the locator isn’t correct
Checking Element State
Sometimes, you don’t want to click — you just want to check the current state of an element.
Selenium provides built-in methods for that.
What they mean:
-
is_displayed()→ Is the element visible on the page? -
is_enabled()→ Can the user interact with it? -
is_selected()→ Is it selected? (checkboxes & radio buttons)
These checks are extremely useful for assertions and validations.
Getting Text from Elements
To read visible text from an element:
Common use cases:
-
Reading error messages
-
Verifying success messages
-
Checking labels or headings
💡 If element.text is empty, it usually means the text is not visible or is inside an attribute.
Getting Attribute Values
Sometimes, the data you need is not visible but stored inside an attribute.
Example:
Useful for:
-
Placeholder text
-
Values inside input fields
-
Hidden attributes
-
Dynamic data
Why Interactions Matter
Interacting with elements is where Selenium:
-
Acts like a real user
-
Triggers application behavior
-
Exposes bugs and issues
Without interactions, your script is just finding elements and doing nothing — which is not automation.
4. Assertions in Selenium (Verification)
Assertions are used to validate expected behavior.
In simple words, assertions answer one very important question:
“Did what I expected actually happen?”
Without assertions, Selenium will happily:
-
open pages
-
click buttons
-
type text
and move on — even if everything is broken.
That’s why automation without assertions is meaningless.

Why Assertions Matter
Assertions help you verify outcomes, not just actions.
With assertions, you can check whether:
-
The page loaded correctly
-
A button exists and is visible
-
The displayed text matches the expected value
-
A user logged in successfully
-
An error message appears when something goes wrong
If you don’t verify these things, Selenium might finish the test and say “Done” — while the application is completely broken 😄
Using Python assert in Selenium
Python provides a simple and powerful assert statement, which works perfectly for Selenium validation.
Let’s look at some common and practical examples.

Verify Page Title
This checks whether the page title contains the word Login.
💡 Useful to confirm that the correct page has loaded.
Verify Element Presence
This ensures that:
-
The element exists
-
It is visible to the user
If this fails, Selenium is basically saying:
“I don’t see the button you’re expecting.”
Verify Text on the Page
This is commonly used to:
-
Validate success messages
-
Check error messages
-
Verify confirmation text
Text validation is one of the most important assertions in real-world projects.
Verify Button Text
This ensures that the UI displays the correct label, which is important for usability and consistency.
Verify Checkbox Selection
This confirms whether a checkbox or radio button is selected.
💡 Especially useful for:
-
“Remember me” options
-
Terms and conditions checkboxes
Final Thought on Assertions
Assertions are the proof that your automation actually tested something.
Without them:
-
Your test may pass
-
Your application may still fail
Good automation always ends with clear verification.
Putting It All Together: A Simple Example
Now let’s connect everything we’ve discussed so far into one simple Selenium script.
What’s Happening Here?
This small script may look simple, but it uses all the core Selenium concepts:
-
✅ Finds elements using locators
-
✅ Interacts with them by typing and clicking
-
✅ Verifies the result using an assertion
In short, Selenium:
-
Opened the browser
-
Acted like a user
-
Checked whether the expected page loaded
That’s real automation.
Final Thoughts
Selenium automation is not about memorizing commands or copying code snippets.
It’s about understanding how web applications work and how Selenium interacts with them.
If you truly master these four concepts:
-
Web Elements
-
Locators
-
Interactions
-
Assertions
You can automate any web application, no matter how simple or complex it looks.
What’s Next?
In upcoming blogs and videos, this foundation can be extended to more advanced and real-world topics such as:
-
Wait strategies (implicit, explicit, fluent waits)
-
Handling alerts, frames, and multiple windows
-
Page Object Model (POM) for clean automation design
-
Test frameworks like PyTest
-
Real-world automation architecture and best practices
If you’ve made it this far — congratulations 🎉
You now understand the core building blocks of Selenium automation.


Comments
Post a Comment